
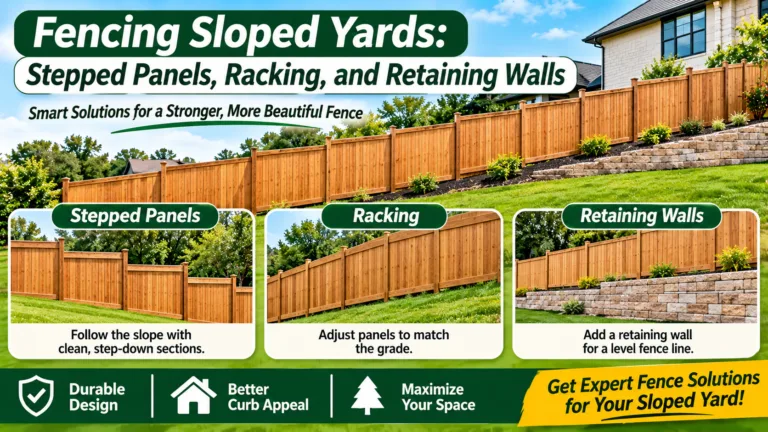
Sloped yards present one of the most common challenges in fence design. A fence that runs straight across a hillside can look awkward, leave large gaps at the bottom, or lean as the soil shifts. Homeowners on sloped lots need to choose between several approaches, each with its own appearance, cost profile, and structural demands. The right solution depends on the slope, the soil, the fence material, and how the fence will be used.
This guide explains the three main approaches to fencing sloped ground, how each handles changes in elevation, and what to consider in drainage and structural support.
Stepped Panels
Stepped fencing follows the ground in a series of level sections. Each panel is set at a new height, creating a staircase effect along the slope. This approach keeps the fence plumb and the rails level within each section, which makes the fence look orderly and keeps the bottom gap consistent. It works well with wood, vinyl, and metal, though the number of steps depends on the grade and the panel width. Stepped fences require careful layout, since each step must be marked and set accurately. The transitions between steps are a visible detail, so they should be planned for a clean appearance. Some designs use a short overlap or a transition post to make the step less abrupt.
Racking
Racking keeps the rails parallel to the slope, so the fence follows the grade continuously. Panels are cut or constructed so their top and bottom rails tilt with the ground. This creates a smooth, flowing line that many homeowners find more attractive than a stepped design. Racking can be done with wood and some vinyl products, while metal panels may require specialized brackets. Racked fences need careful fitting because the panels are not square in the usual sense. The posts must be set accurately, and the bottom gap must be checked to avoid large openings where the ground drops away. Racking is often more labor-intensive than stepping, and the appearance depends heavily on craftsmanship.
Combining Fence and Retaining Wall
On steep slopes, a retaining wall may be needed to hold the soil and create a flat area. The fence can then be placed on top of the wall, or the wall itself can serve as part of the boundary. Retaining walls require their own engineering and drainage design, and they can be expensive compared with a fence alone. Their structural role must be considered before planning a fence on top. Retaining walls should include drainage behind the wall to prevent water pressure from building up. Weep holes, drain rock, and proper backfill all help. A fence placed on a wall must be anchored to the wall or to posts set into the structure, and the loads must be calculated carefully.
Drainage on Sloped Lots
Water moves downhill, and fence lines on slopes can channel it along the posts and bottom rails. Concentrated water can erode soil at the base of posts, wash out footings, and accelerate rot. Drainage paths should be designed so water flows away from the fence and footings. Swales, french drains, and gravel strips can help direct runoff. Check how water from the upslope area will reach the fence line. A fence that blocks a natural drainage path can cause ponding on the uphill side and erosion on the downhill side. Discuss drainage with your contractor before building.
Post Depth and Footings
Posts on slopes often carry different loads than posts on level ground. The downhill side may be exposed as soil erodes, while the uphill side may be buried more deeply. Footings should be designed to resist both soil movement and lateral loads from wind and any soil pressure. Deeper footings and larger concrete bases can help, especially on the downhill side of a slope. Discuss the soil conditions with the crew. Clay, rock, or caliche can change how posts are set and how deep they can go.
Gates on Slopes
Gates on sloped ground require special attention. A gate that opens uphill or downhill may bind against the ground or leave an uneven clearance. Gates are often best placed where the grade is gentlest, or they can be designed with a level section that transitions to the sloped fence. The gate’s clearance must be checked at both ends of its swing. Gate hardware should be selected for the angle of installation, and the latch should be easy to reach from both sides. A gate that is hard to operate on a slope is frustrating in daily use.
Material Choices for Slopes
Wood can be stepped or racked effectively, though it requires good drainage and careful sealing at cut edges. Vinyl panels are versatile and low maintenance, but they must be matched to the grade and the manufacturer’s installation guidance. Metal fences, such as aluminum and steel, can handle slopes well with appropriate brackets, and their clean lines can look sharp on a grade. Chain link can follow the ground closely and is often used on sloped boundaries, though its appearance is different from solid or ornamental fencing. Choose the material that matches the look you want, the maintenance you are prepared to do, and the conditions on your lot.
Keeping the Bottom Gap Under Control
A large gap at the bottom of a fence on a slope can allow pets to escape, let debris and wildlife through, and reduce privacy. Stepped and racked designs help keep the gap even, but soil may still shift over time. Check the bottom gap regularly and fill or regrade as needed. For containment, a bottom skirt or base barrier can close gaps that develop. Avoid letting soil build up against the fence, since that can trap moisture and promote rot. Keep the grade slightly lower at the fence line where that does not compromise drainage.
Working With a Qualified Crew
Sloped fencing is among the more demanding fence projects, and a crew with experience on grades will make a noticeable difference. Ask how the contractor plans to handle the slope, what drainage measures are proposed, and how the bottom gap will be controlled. Request a written proposal that shows the design approach and includes any retaining wall or drainage work. A Fencing Company in Temple can evaluate your lot and recommend stepping, racking, or a combined approach. A fence contractor in Temple can design the footings and drainage to match the slope. Homeowners who need roof drainage changes near the fence line can coordinate with a Roof Installation Services Belton provider, while a Roof Repair Services Harker Heights specialist can review how gutters and downspouts discharge onto the slope. A Roof Installation Services Killeen provider or a Roof Repair Services Temple provider can also help when roof runoff contributes to erosion below the fence.
Roof Sealants, Caulk, and Adhesives: Where They Belong and Where They Do Not
Choosing the Right Sealant for Roof Edges, Flashing, and Repairs
Sealants are among the most common materials used on roofs, and they are also among the most misused. A tube of caulk can look like a quick fix for a leak, and a bead of roof cement can seem to solve a flashing problem. In reality, sealants are useful supporting materials that work best when they are chosen for the right purpose and applied correctly. When a sealant is used as the main waterproofing layer, it tends to fail sooner, and it can hide the true source of a problem. Understanding where sealants belong helps homeowners evaluate repairs and avoid recurring leaks.
This guide explains the main types of roofing sealants, the situations where they are appropriate, and the signs that a sealant is being used to cover a problem that needs a proper repair.
Why Sealants Are Not a Substitute for Flashing
Flashing is designed to direct water over and away from roof joints. It relies on overlapping metal or membrane pieces installed in the correct sequence. Sealant, by contrast, fills gaps and bonds surfaces, but it does not carry water away. Over time, sealant can crack, shrink, lose adhesion, or pull away under heat and movement. When sealant is used in place of proper flashing, water may find its way beneath the seal once the sealant fails. A reliable roof detail uses sealant to support flashing, not to replace it. Edges, seams, and fasteners may be sealed, but the primary defense against water should be the flashing and covering itself.
Common Types of Roofing Sealant
Roofing sealants fall into several broad categories. Asphalt-based roof cements are often used for minor repairs to shingles, flashing edges, and small gaps. Polyurethane and silicone sealants are more flexible and can handle movement and temperature changes better. Butyl sealants are used for certain metal joints and penetrations because of their adhesion and flexibility. Each type has strengths and limits, and the manufacturer’s guidance should determine where it is used. Not all sealants are compatible with all roofing materials. Some can damage membranes or react with certain coatings. Confirm compatibility before using any product on a roof.
Appropriate Uses for Sealant
Sealants have legitimate roles on roofs. They can seal the edges of metal flashing where manufacturer details call for it, secure loose shingle tabs in certain cases, and fill small gaps around penetrations as a secondary measure. They can also help seal fastener heads and joints in metal roofing systems. In each case, the sealant supports a properly designed assembly. Sealant is also used during installation to bond components, such as the adhesive strips on shingles that help them resist wind. These strips form a bond when warm, and they are a designed feature of the shingle rather than a repair material.
When Sealant Is Being Misused
Sealant becomes a problem when it is used to cover a failed flashing, a missing shingle, or a gap that should have been repaired with new material. Thick globs of caulk over open seams, roof cement spread over cracks in a flashing, and repeated recoating of the same joint are all signs of a deeper issue. These fixes may look neat for a time, but they usually conceal damage that continues to grow beneath. If you see sealant on a roof, ask a qualified contractor to examine what is underneath. The sealant may be hiding a flashing gap, a deteriorated underlayment, or a fastener that has backed out.
Sealants Around Chimneys and Vents
Chimneys, vent pipes, and skylights are typical places for sealant use. Mortar joints around a chimney may need repointing, and counter-flashing may need resetting. Vent pipe boots can crack, and the sealant around them may fail before the boot does. Sealant can supplement these repairs, but the underlying flashing or boot should be replaced if it is damaged. Skylight flashing kits are designed for specific units, and sealant should be applied only where the manufacturer specifies. A roofer who understands these details will explain whether the repair calls for sealant, new flashing, or both.
Sealants on Edges and Drip Edge
Drip edge and rake edges are sometimes sealed, depending on the design. Sealant can help close small gaps where the edge meets the fascia or the roof covering, but it cannot replace correct installation of the drip edge and underlayment. If the edge is lifting or separating, the issue should be addressed with proper fastening and trim. Check edges after storms for lifted sections and failed sealant. Early attention prevents water from reaching the fascia and deck.
Preparing Surfaces for Sealant
Sealant performs only as well as the surface beneath it. Dirt, moisture, loose granules, old sealant, and rust must be removed before a new product is applied. Surfaces should be dry, clean, and sound. Applying sealant over a dirty or wet surface can cause early failure. Follow the product’s instructions for temperature, surface preparation, and cure time. Weather matters too. Many sealants cannot be applied in cold weather or in direct sun on a hot roof, and rain can ruin an uncured application.
Signs a Sealant Repair Is Not Enough
Watch for repeated leaks at the same location, sealant that has cracked or pulled away quickly after application, rust on flashing, soft or stained decking beneath a sealed joint, and sealant that has spread over a large area. Any of these signs suggests that the repair should be reviewed by a professional rather than recoated. Persistent leaks often signal a need for new flashing or repaired underlayment. A Roof Repair Services Harker Heights provider can examine the joint, remove failed sealant safely, and recommend proper repairs.
Choosing a Qualified Roofer
Ask the roofer to explain where sealant will be used, what product will be applied, and why it is appropriate for that location. A reliable contractor will not rely on sealant as a shortcut and will be able to show how flashing, underlayment, and covering work together. Request written details about any sealant products in the proposal, since they may affect the warranty. A Roof Installation Services Belton provider can explain how sealants fit into a complete roof assembly. A Roof Installation Services Killeen provider can handle larger repairs that require new flashing and proper integration.
Keeping Sealants in Their Place
Sealants are valuable when they support properly designed roof details and are chosen for their intended purpose. They should not be used to hide damage or replace missing flashing. Inspect sealed areas regularly, repair failures promptly, and treat sealant as a supporting layer rather than the main defense. A Fencing Company in Temple can help keep the exterior drainage path clear so water does not collect near sealed joints at the wall. A fence contractor in Temple can review grading near the foundation where roof runoff discharges. For roof sealant evaluation and proper flashing repair, a Roof Repair Services Temple provider can assess the work and recommend the right fix.